While driving to work, I noticed at a stoplight that after I had the clutch depressed for a minute or so, when I let it out to engage the clutch, the engagement point was much closer to the floor than when I had engaged it. Hmmmm. Something not right. After a few days of this I realized that fluid must be leaking past the 29 year old piston seals and a new clutch master cylinder would be needed.
My philosphy has been more and more toward Original Equipment Manufacturer (OEM, better known as genuine Toyota) replacement parts, so I ordered a new clutch master from my local dealer. They overcharged me, but I took solace in the knowledge that it would be a simple bolt-up, with no hassles. Little did I know....
I set aside an evening to do the job, got out my tools and pulled out the old clutch master. Cool, the new one bolted right up to the firewall, and had the same length rod as the old one, things were going smoothly. But then, when I tried to connect the hydraulic fittings, I realized that something was not quite right. Try as I could, they were not the same threads on the new one as the old one. Even the banjo fitting was smaller on the new one. Finally, I gave up and put the old one back in so I could at least drive to work the next day.
I figured the dealer screwed up and sold me a clutch master for perhaps a different year. No they insisted, that was the correct application. They offered to take it back and refund my money, but I still needed a new clutch master cylinder. I tried NAPA, they ordered in an aftermarket one for me. When I took the new one to the NAPA dealer and compared it, the NAPA unit was the same, it would not work on my older application. I went out and bought a double flare tool, thinking that perhaps I could simply buy the right threaded fitting, cut the line, put the new fitting on and reflare the line. I ordered and recieved a new hardline, which had the 10mm x 1.00 mm threads as the new master.
But nooooo. Not only did no one in town have the fittings with the threads that would fit my application, but the OD of the hardlines were different, the new one was 3/16" OD and the old one was 1/4" OD. Another solution would have to be tried.
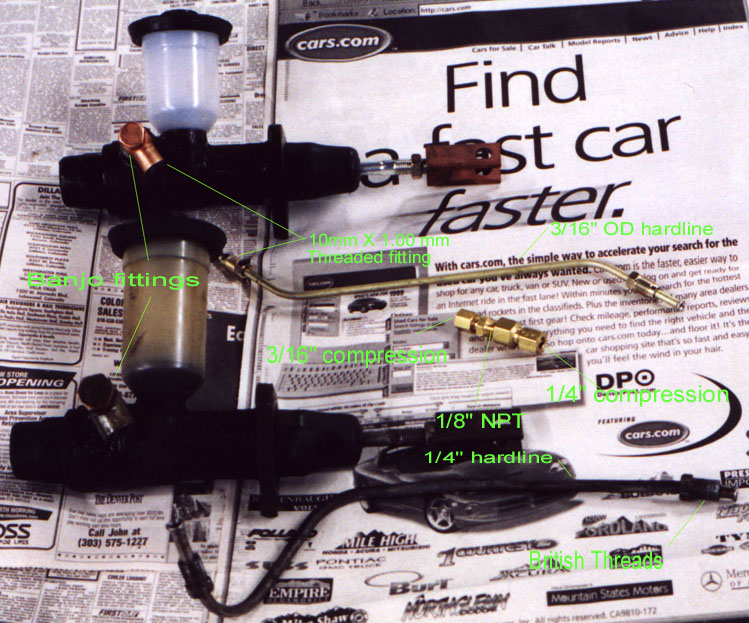
Finally, I decided that the best way to solve the different thread and hardline size dillemma would be to somehow graft the two together. Use the original, weird threaded (about 11mm x 1.00 mm) fitting and larger 1/4" hardline and connect it somehow to the newer 10mm x 1.00mm with 3/16" OD hardline fitting. Many calls to various potential suppliers, (brake shops, parts stores, cruiser places, hardware stores) and finally a Denver hardware store was able to help me. The solution would be compression fittings on the hardlines, with pipe threaded fittings to connect the compression fittings. Okay, it's a little Rube Goldberg, but it worked. The photo below illustrates the dillemma, the various parts involved and how they will connect.
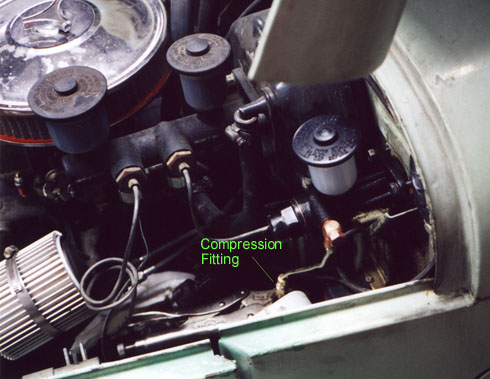
In the photo below, you can see how the new clutch master cylinder is installed.
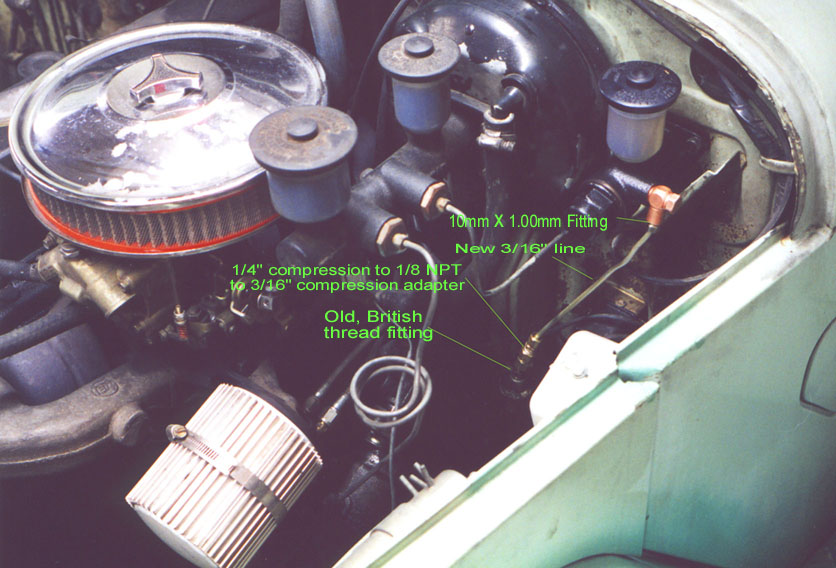
And here is another view, showing how it is put together. The old fitting and a short length of the old hard line were used near the bottom, then the compression fitting/hardline OD adapters, then the new hardline and fittings connected to the new clutch master cylinder above that.
According to Jim Chenoweth, Toyota used those "Bastard threads" (his term) until sometime in mid 1971 when they switched over to true metric standard. So if you have an older model Land Cruiser, beware the differences in threads between new parts available today, versus what was originally put in at the factory.